· 3 min read

How many GPUs do I need to be able to serve Llama 70B? In order to answer that, you need to know how much GPU memory will be required by the Large Language Model.

The formula is simple:

M=(P4B)(32/Q)1.2M = \dfrac{(P * 4B)}{ (32 / Q)} * 1.2
SymbolDescription
MGPU memory expressed in Gigabyte
PThe amount of parameters in the model. E.g. a 7B model has 7 billion parameters.
4B4 bytes, expressing the bytes used for each parameter
32There are 32 bits in 4 bytes
QThe amount of bits that should be used for loading the model. E.g. 16 bits, 8 bits or 4 bits.
1.2Represents a 20% overhead of loading additional things in GPU memory.

Now let's try out some examples.

GPU memory required for serving Llama 70B

Let's try it out for Llama 70B that we will load in 16 bit. The model has 70 billion parameters.

704bytes32/161.2=168GB\dfrac{70 * 4 \mathrm{bytes}}{32 / 16} * 1.2 = 168\mathrm{GB}

That's quite a lot of memory. A single A100 80GB wouldn't be enough, although 2x A100 80GB should be enough to serve the Llama 2 70B model in 16 bit mode.

How to further reduce GPU memory required for Llama 2 70B?

Quantization is a method to reduce the memory footprint. Quantization is able to do this by reducing the precision of the model's parameters from floating-point to lower-bit representations, such as 8-bit integers. This process significantly decreases the memory and computational requirements, enabling more efficient deployment of the model, particularly on devices with limited resources. However, it requires careful management to maintain the model's performance, as reducing precision can potentially impact the accuracy of the outputs.

In general, the consensus seems to be that 8 bit quantization achieves similar performance to using 16 bit. However, 4 bit quantization could have a noticeable impact to the model performance.

Let's do another example where we use 4 bit quantization of Llama 2 70B:

704bytes32/41.2=42GB\dfrac{70 * 4 \mathrm{bytes}}{32 / 4} * 1.2 = 42\mathrm{GB}

This is something you could run on 2 x L4 24GB GPUs.

Relevant tools and resources

  1. Tool for checking how many GPUs you need for a specific model
  2. Transformer Math 101

Got more questions? Don't hesitate to join our Discord and ask away.
discord-invite

· 3 min read
mistral 7b k8s helm

Learn how to use the text-generation-inference (TGI) Helm Chart to quickly deploy Mistral 7B Instruct on your K8s cluster.

Add the Substratus.ai Helm repo:

helm repo add substratusai https://substratusai.github.io/helm

This command adds a new Helm repository, making the text-generation-inference Helm chart available for installation.

Create a configuration file named values.yaml. This file will contain the necessary settings for your deployment. Here’s an example of what the content should look like:

model: mistralai/Mistral-7B-Instruct-v0.1
# resources: # optional, override if you need more than 1 GPU
# limits:
# nvidia.com/gpu: 1
# nodeSelector: # optional, can be used to target specific GPUs
# cloud.google.com/gke-accelerator: nvidia-l4

In this configuration file, you are specifying the model to be deployed and optionally setting resource limits or targeting specific nodes based on your requirements.

With your configuration file ready, you can now deploy Mistral 7B Instruct using Helm:

helm install mistral-7b-instruct substratusai/text-generation-inference \
-f values.yaml

This command initiates the deployment, creating a Kubernetes Deployment and Service based on the settings defined in your values.yaml file.

After initiating the deployment, it's important to ensure that everything is running as expected. Run the following command to get detailed information about the newly created pod:

kubectl describe pod -l app.kubernetes.io/instance=mistral-7b-instruct

This will display various details about the pod, helping you to confirm that it has been successfully created and is in the right state. Note that depending on your cluster's setup, you might need to wait for the cluster autoscaler to provision additional resources if necessary.

Once the pod is running, check the logs to ensure that the model is initializing properly:

kubectl logs -f -l app.kubernetes.io/instance=mistral-7b-instruct

The model first downloads the model and after a few minutes, you should see a message that looks like this:

Invalid hostname, defaulting to 0.0.0.0

This is expected and means it's now serving on host 0.0.0.0.

By default, the model is only accessible within the Kubernetes cluster. To access it from your local machine, set up a port forward:

kubectl port-forward deployments/mistral-7b-instruct-text-generation-inference 8080:8080

This command maps port 8080 on your local machine to port 8080 on the deployed pod, allowing you to interact with the model directly.

With the service exposed, you can now run inference tasks. To explore the available API endpoints and their usage, visit the TGI API documentation at http://localhost:8080/docs.

Here’s an example of how to use curl to run an inference task:

curl 127.0.0.1:8080/generate -X POST \
-H 'Content-Type: application/json' \
--data-binary @- << 'EOF' | jq -r '.generated_text'
{
"inputs": "<s>[INST] Write a K8s YAML file to create a pod that deploys nginx[/INST]",
"parameters": {"max_new_tokens": 400}
}
EOF

In this example, we are instructing the model to generate a Kubernetes YAML file for deploying an Nginx pod. The prompt includes specific tokens that the Mistral 7B Instruct model recognizes, ensuring accurate and context-aware responses.

The prompt we are using starts with <s> token which indicates beginning of a sequence. The [INST] token tells Mistral-7b Instruct what follows is an instruction. The Mistral 7B Instruct model was finetuned with this prompt template, so it's important to re-use that same prompt template.

The response is quite impressive, it did return a valid K8s YAML manifest and also instructions on how to apply it.

Need help? Want to see other models? other serving frameworks?
Join our Discord and ask me directly:

discord-invite

· 3 min read
kubectl notebook

Excited to announce the K8s YAML dataset containing 276,520 valid K8s YAML files.

HuggingFace Dataset: https://huggingface.co/datasets/substratusai/the-stack-yaml-k8s
Source code: https://github.com/substratusai/the-stack-yaml-k8s

Why?

  • This dataset can be used to fine-tune an LLM directly
  • New datasets can be created from his dataset such as an K8s instruct dataset (coming soon!)
  • What's your use case?

How?

Getting a lot of K8s YAML manifests wasn't easy. My initial approach was to use the Kubernetes website and scrape the YAML example files, however the issue was the quantity since I could only scrape about ~250 YAML examples that way.

Luckily, I came across the-stack dataset which is a cleaned dataset of code on GitHub. The dataset is nicely structured by language and I noticed that yaml was one of the languages in the dataset.

Install libraries used in this blog post:

pip3 install datasets kubernetes-validate

Let's load the the-stack dataset but only the YAML files (takes about 200GB of disk space):

from datasets import load_dataset
ds = load_dataset("bigcode/the-stack", data_dir="data/yaml", split="train")

Once loaded there are 13,439,939 YAML files in ds.

You can check the content of one of the files:

print(ds[0]["content"])

You probably notice that this ain't a K8s YAML file, so next we need to filter these 13 million YAML files and only keep the one that have valid K8 YAML.

The approach I took was to use the kubernetes-validate OSS library. It turned out that YAML parsing was too slow so I added a 10x speed improvement by eagerly checking if "Kind or "kind" is not a substring in the YAML file.

Here is the validate function that takes the yaml_content as a string and returns if the content was valid K8s YAML or not:

import kubernetes_validate
import yaml

def validate(yaml_content: str):
try:
# Speed optimization to return early without having to load YAML
if "kind" not in yaml_content and "Kind" not in yaml_content:
return False
data = yaml.safe_load(yaml_content)
kubernetes_validate.validate(data, '1.22', strict=True)
return True
except Exception as e:
return False

validate(ds[0]["content"])

Now all that's needed is to filter out all YAML files that aren't valid:

import os
os.cpu_count()
valid_k8s = ds.filter(lambda batch: [validate(x) for x in batch["content"]],
num_proc=os.cpu_count(), batched=True)

There were 276,520 YAML files left in valid_k8s. You can print one again to see:

print(valid_k8s[0]["content"])

You can upload the dataset back to HuggingFace by running:

valid_k8s.push_to_hub("substratusai/the-stack-yaml-k8s")

What's next?

Creating a new dataset called K8s Instruct that also provides a prompt for each YAML file.

Support the project by adding a star on GitHub! ❤️ Star

· 2 min read

Don't you just love it when you submit a PR and it turns out that no code is needed? That's exactly what happened when I tried add GPU support to Kind.

In this blog post you will learn how to configure Kind such that it can use the GPUs on your device. Credit to @klueska for the solution.

Install the NVIDIA container toolkit by following the official install docs.

Configure NVIDIA to be the default runtime for docker:

sudo nvidia-ctk runtime configure --runtime=docker --set-as-default
sudo systemctl restart docker

Set accept-nvidia-visible-devices-as-volume-mounts = true in /etc/nvidia-container-runtime/config.toml:

sudo sed -i '/accept-nvidia-visible-devices-as-volume-mounts/c\accept-nvidia-visible-devices-as-volume-mounts = true' /etc/nvidia-container-runtime/config.toml

Create a Kind Cluster:

kind create cluster --name substratus --config - <<EOF
apiVersion: kind.x-k8s.io/v1alpha4
kind: Cluster
nodes:
- role: control-plane
image: kindest/node:v1.27.3@sha256:3966ac761ae0136263ffdb6cfd4db23ef8a83cba8a463690e98317add2c9ba72
# required for GPU workaround
extraMounts:
- hostPath: /dev/null
containerPath: /var/run/nvidia-container-devices/all
EOF

Workaround for issue with missing required file /sbin/ldconfig.real:

# https://github.com/NVIDIA/nvidia-docker/issues/614#issuecomment-423991632
docker exec -ti substratus-control-plane ln -s /sbin/ldconfig /sbin/ldconfig.real

Install the K8s NVIDIA GPU operator so K8s is aware of your NVIDIA device:

helm repo add nvidia https://helm.ngc.nvidia.com/nvidia || true
helm repo update
helm install --wait --generate-name \
-n gpu-operator --create-namespace \
nvidia/gpu-operator --set driver.enabled=false

You should now have a working Kind cluster that can access your GPU. Verify it by running a simple pod:

kubectl apply -f - << EOF
apiVersion: v1
kind: Pod
metadata:
name: cuda-vectoradd
spec:
restartPolicy: OnFailure
containers:
- name: cuda-vectoradd
image: "nvcr.io/nvidia/k8s/cuda-sample:vectoradd-cuda11.7.1-ubuntu20.04"
resources:
limits:
nvidia.com/gpu: 1
EOF

· 3 min read

Llama.cpp is a great way to run LLMs efficiently on CPUs and GPUs. The downside however is that you need to convert models to a format that's supported by Llama.cpp, which is now the GGUF file format. In this blog post you will learn how to convert a HuggingFace model (Vicuna 13b v1.5) to GGUF model.

At the time of writing, Llama.cpp supports the following models:

  • LLaMA 🦙
  • LLaMA 2 🦙🦙
  • Falcon
  • Alpaca
  • GPT4All
  • Chinese LLaMA / Alpaca and Chinese LLaMA-2 / Alpaca-2
  • Vigogne (French)
  • Vicuna
  • Koala
  • OpenBuddy 🐶 (Multilingual)
  • Pygmalion 7B / Metharme 7B
  • WizardLM
  • Baichuan-7B and its derivations (such as baichuan-7b-sft)
  • Aquila-7B / AquilaChat-7B

At a high-level you will be going through the following steps:

  • Downloading a HuggingFace model
  • Running llama.cpp convert.py on the HuggingFace model
  • (Optionally) Uploading the model back to HuggingFace

Downloading a HuggingFace model

There are various ways to download models, but in my experience the huggingface_hub library has been the most reliable. The git clone method occasionally results in OOM errors for large models.

Install the huggingface_hub library:

pip install huggingface_hub

Create a Python script named download.py with the following content:

from huggingface_hub import snapshot_download
model_id="lmsys/vicuna-13b-v1.5"
snapshot_download(repo_id=model_id, local_dir="vicuna-hf",
local_dir_use_symlinks=False, revision="main")

Run the Python script:

python download.py

You should now have the model downloaded to a directory called vicuna-hf. Verify by running:

ls -lash vicuna-hf

Converting the model

Now it's time to convert the downloaded HuggingFace model to a GGUF model. Llama.cpp comes with a converter script to do this.

Get the script by cloning the llama.cpp repo:

git clone https://github.com/ggerganov/llama.cpp.git

Install the required python libraries:

pip install -r llama.cpp/requirements.txt

Verify the script is there and understand the various options:

python llama.cpp/convert.py -h

Convert the HF model to GGUF model:

python llama.cpp/convert.py vicuna-hf \
--outfile vicuna-13b-v1.5.gguf \
--outtype q8_0

In this case we're also quantizing the model to 8 bit by setting --outtype q8_0. Quantizing helps improve inference speed, but it can negatively impact quality. You can use --outtype f16 (16 bit) or --outtype f32 (32 bit) to preserve original quality.

Verify the GGUF model was created:

ls -lash vicuna-13b-v1.5.gguf

Pushing the GGUF model to HuggingFace

You can optionally push back the GGUF model to HuggingFace.

Create a Python script with the filename upload.py that has the following content:

from huggingface_hub import HfApi
api = HfApi()

model_id = "substratusai/vicuna-13b-v1.5-gguf"
api.create_repo(model_id, exist_ok=True, repo_type="model")
api.upload_file(
path_or_fileobj="vicuna-13b-v1.5.gguf",
path_in_repo="vicuna-13b-v1.5.gguf",
repo_id=model_id,
)

Get a HuggingFace Token that has write permission from here: https://huggingface.co/settings/tokens

Set your HuggingFace token:

export HUGGING_FACE_HUB_TOKEN=<paste-your-own-token>

Run the upload.py script:

python upload.py

Interested in learning how to automate flows like this? Checkout our open source project: Star

· 3 min read
kubectl notebook

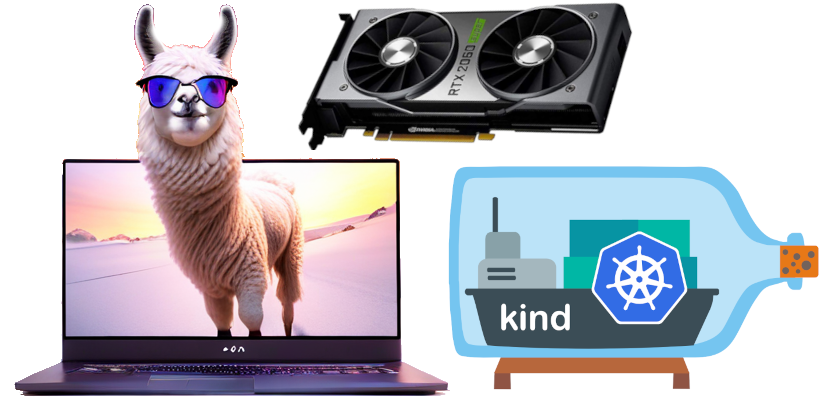
A Llama 13B parameter model running on a laptop with a mere RTX 2060?! Yes, it all ran surprisingly well at around 7 tokens / sec. Follow along and learn how to do this on your environment.

My laptop setup looks like this:

  • Kind for deploying a single node K8s cluster
  • AMD Ryzen 7 (8 threads), 16 GB system memory, RTX 2060 (6GB GPU memory)
  • Llama.cpp/GGML for fast serving and loading larger models on consumer hardware

You might be wondering: How can a model with 13 billion parameters fit into a 6GB GPU? You'd expect it to need about 13GB, especially if it's running in 4-bit mode, right? Yes it should because 13 billion * 4 bytes / (32 bits / 4 bits) = 13 GB. But thanks to Llama.cpp, we can load only parts of the model into the GPU. Plus, Llama.cpp can run efficiently just using the CPU.

Want to try this out yourself? Follow a long for a fun ride.

Create Kind K8s cluster with GPU support

Install the NVIDIA container toolkit for Docker: Install Guide

Use the convenience script to create a Kind cluster and configure GPU support:

bash <(curl https://raw.githubusercontent.com/substratusai/substratus/main/install/kind/up-gpu.sh)

Or inspect the script and run the steps one by one.

Install Substratus

Install the Substratus K8s operator which will orchestrate model loading and serving:

kubectl apply -f https://raw.githubusercontent.com/substratusai/substratus/main/install/kind/manifests.yaml

Load the Llama 2 13b chat GGUF model

Create a Model resource to load the Llama 2 13b chat GGUF model

apiVersion: substratus.ai/v1
kind: Model
metadata:
name: llama2-13b-chat-gguf
spec:
image: substratusai/model-loader-huggingface
params:
name: substratusai/Llama-2-13B-chat-GGUF
files: "model.bin"
kubectl apply -f https://raw.githubusercontent.com/substratusai/substratus/main/examples/llama2-13b-chat-gguf/base-model.yaml

The model is being downloaded from HuggingFace into your Kind cluster.

Serve the model

Create a Server resource to serve the model: embedmd:# (https://raw.githubusercontent.com/substratusai/substratus/main/examples/llama2-13b-chat-gguf/server-gpu.yaml yaml)

apiVersion: substratus.ai/v1
kind: Server
metadata:
name: llama2-13b-chat-gguf
spec:
image: substratusai/model-server-llama-cpp:latest-gpu
model:
name: llama2-13b-chat-gguf
params:
n_gpu_layers: 30
resources:
gpu:
count: 1
kubectl apply -f https://raw.githubusercontent.com/substratusai/substratus/main/examples/llama2-13b-chat-gguf/server-gpu.yaml

Note in my case 30 out of 42 layers loaded into GPU is the max, but you might be able to load all 42 layers into the GPU if you have more GPU memory.

Once the model is ready it will start serving an OpenAI compatible API endpoint.

Expose the Server to a local port by using port forwarding:

kubectl port-forward service/llama2-13b-chat-gguf-server 8080:8080

Let's throw some prompts at it:

curl http://localhost:8080/v1/completions \
-H "Content-Type: application/json" \
-d '{ "prompt": "Who was the first president of the United States?", "stop": ["."]}'

Checkout the full API docs here: http://localhost:8080/docs

You can play around with other models. For example, if you have a 24 GB GPU card you should be able to run Llama 2 70B in 4 bit mode by using llama.cpp.

Support the project by adding a star on GitHub! ❤️ Star

· 3 min read
Nick Stogner
kubectl notebook

Substratus has added the kubectl notebook command!

"Wouldn't it be nice to have a single command that containerized your local directory and served it as a Jupyter Notebook running on a machine with a bunch of GPUs attached?"

The conversation went something like that while we daydreamed about our preferred workflow. At that point in time we were hopping back-n-forth between Google Colab and our containers while developing a LLM training job.

"Annnddd it should automatically sync file-changes back to your local directory so that you can commit your changes to git and kick off a long-running ML training job - containerized with the exact same python version and packages!"

So we built it!

kubectl notebook -d .

And now it has become an integral part of our workflow as we build out the Substratus ML platform.

Check out the 50 second screenshare:

Design Goals

  1. One command should build, launch, and sync the Notebook.
  2. Users should only need a Kubeconfig - no other credentials.
  3. Admins should not need to setup networking, TLS, etc.

Implementation

We tackled our design goals using the following techniques:

  1. Implemented as a single Go binary, executed as a kubectl plugin.
  2. Signed URLs allow for users to upload their local directory to a bucket without requiring cloud credentials (Similar to how popular consumer clouds function).
  3. Kubernetes port-forwarding allows for serving remote notebooks without requiring admins to deal with networking / TLS concerns. It also leans on existing Kubernetes RBAC for access control.

Some interesting details:

  • Builds are executed remotely for two reasons:
    • Users don't need to install docker.
    • It avoids pushing massive container images from one's local machine (pip installs often inflate the final docker image to be much larger than the build context itself).
  • The client requests an upload URL by specifying the MD5 hash it wishes to upload - allowing for server-side signature verification.
  • Builds are skipped entirely if the MD5 hash of the build context already exists in the bucket.

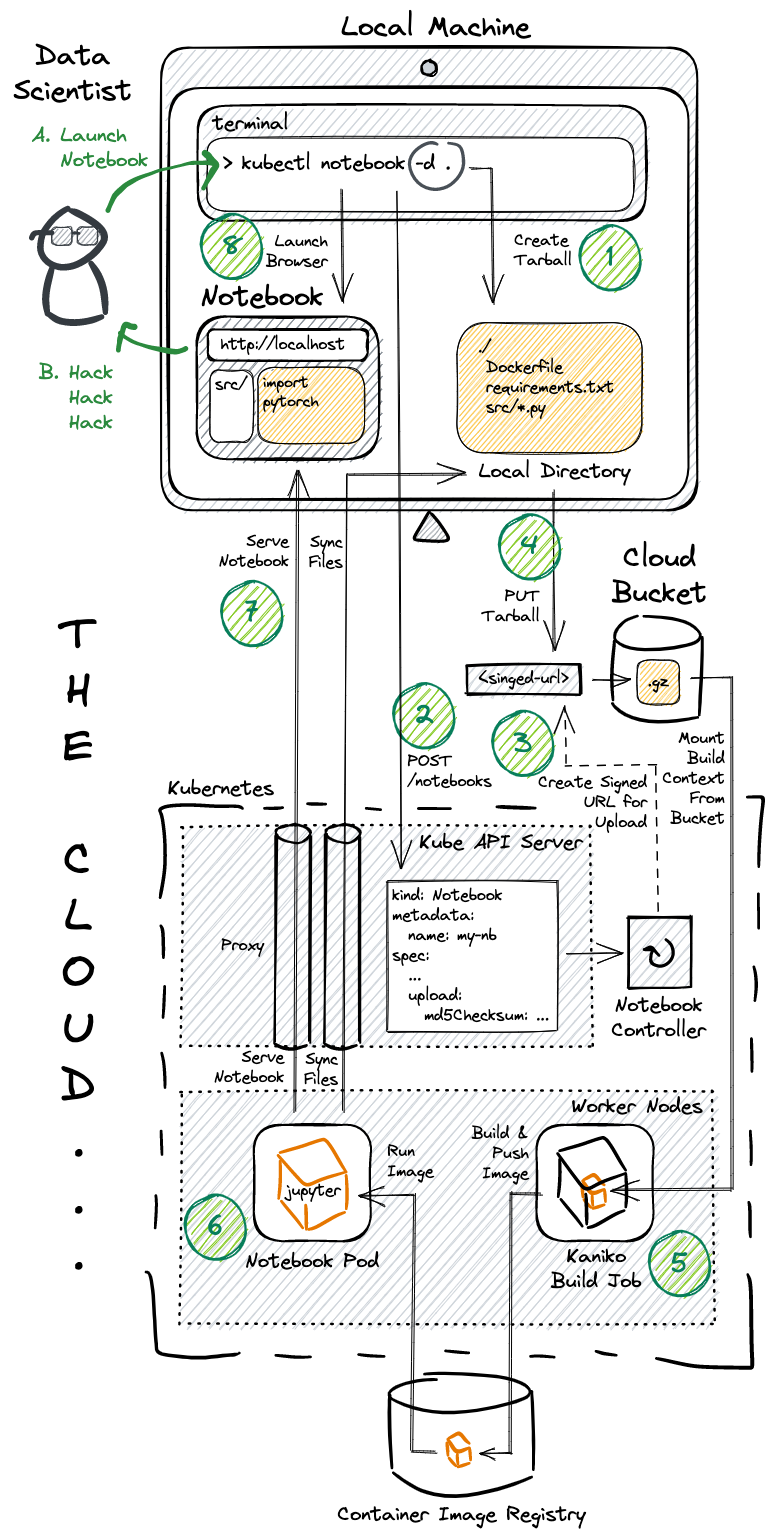
The system underneath the notebook command:

diagram

More to come!

Lazy-loading large models from disk... Incremental dataset loading... Stay tuned to learn more about how Notebooks on Substratus can speed up your ML workflows.

Don't forget to star and follow the repo!

https://github.com/substratusai/substratus

Star

· 3 min read

Llama 2 70b is the newest iteration of the Llama model published by Meta, sporting 7 Billion parameters. Follow along in this tutorial to get Llama 2 70b deployed on GKE:

  1. Create a GKE cluster with Substratus installed.
  2. Load the Llama 2 70b model from HuggingFace.
  3. Serve the model via an interactive inference server.

Install Substratus on GCP

Use the Installation Guide for GCP to install Substratus.

Load the Model into Substratus

You will need to agree to HuggingFace's terms before you can use the Llama 2 model. This means you will need to pass your HuggingFace token to Substratus.

Let's tell Substratus how to import Llama 2 by defining a Model resource. Create a file named base-model.yaml with the following content:

apiVersion: substratus.ai/v1
kind: Model
metadata:
name: llama-2-70b
spec:
image: substratusai/model-loader-huggingface
env:
# You would first have to create a secret named `ai` that
# has the key `HUGGING_FACE_HUB_TOKEN` set to your token.
# E.g. create the secret by running:
# kubectl create secret generic ai --from-literal="HUGGING_FACE_HUB_TOKEN=<my-token>
HUGGING_FACE_HUB_TOKEN: ${{ secrets.ai.HUGGING_FACE_HUB_TOKEN }}
params:
name: meta-llama/Llama-2-70b-hf

Get your HuggingFace token by going to HuggingFace Settings > Access Tokens.

Create a secret with your HuggingFace token:

kubectl create secret generic ai --from-literal="HUGGING_FACE_HUB_TOKEN=<my-token>

Make sure to replace <my-token> with your actual token.

Run the following command to load the base model:

kubectl apply -f base-model.yaml

Watch Substratus kick off your importing Job.

kubectl get jobs -w

You can view the Job logs by running:

kubectl logs -f jobs/llama-2-70b-modeller

Serve the Loaded Model

While the Model is loading, we can define our inference server. Create a file named server.yaml with the following content:

apiVersion: substratus.ai/v1
kind: Server
metadata:
name: llama-2-70b
spec:
image: substratusai/model-server-basaran
model:
name: llama-2-70b
env:
MODEL_LOAD_IN_4BIT: "true"
resources:
gpu:
type: nvidia-a100
count: 1

Create the Server by running:

kubectl apply -f server.yaml

Once the Model is loaded (marked as ready), Substratus will automatically launch the server. View the state of both resources using kubectl:

kubectl get models,servers

To view more information about either the Model or Server, you can use kubectl describe:

kubectl describe -f base-model.yaml
# OR
kubectl describe -f server.yaml

Once the model is loaded, the initial server startup time is about 20 minutes. This is because the model is 100GB+ in size and takes a while to load into GPU memory.

Look for a log message that the container is serving at port 8080. You can check the logs by running:

kubectl logs deployment/llama-2-70b-server

For demo purposes, you can use port forwarding once the Server is ready on port 8080. Run the following command to forward the container port 8080 to your localhost port 8080:

kubectl port-forward service/llama-2-70b-server 8080:8080

Interact with Llama 2 in your browser: http://localhost:8080

You have now deployed Llama 2 70b!

You can repeat these steps for other models. For example, you could instead deploy the "Instruct" variation of Llama.

Stay tuned for another blog post on how to fine-tune Llama 2 70b on your own data.

· 3 min read
Brandon Bjelland
Nick Stogner
Sam Stoelinga

We are excited to introduce Substratus, the open-source cross-cloud substrate for training and serving ML models with an initial focus on Large Language Models. Fine-tune and serve LLMs on your Kubernetes clusters in your cloud.

Can’t wait? - Get started with our quick start docs or jump over to the GitHub repo.

Why Substratus?

Press the fast-button for ML: Leverage out of the box container images to load a base model, optionally fine-tune with your own dataset and spin up a model server, all without writing any code.

Notebook-integrated workflows: Launch a remote, containerized, GPU-enabled notebook from a local directory with a single command. Develop in the exact same environment as your long running training jobs.

No vendor lock-in: Substratus is open-source and can run anywhere Kubernetes runs.

Keep company data internal: Deploy in your cloud account. Training data and inference APIs stay within your company’s network.

Best practices by default: Substratus models are immutable and contain information about their lineage. Datasets are imported and snapshotted using off-the-shelf manifests. Training executes in containerized environments, using immutable base artifacts. Inference servers are pre-configured to leverage quantization on supported models. GitOps is built-in, not bolted-on.

Guiding Principles

As we continue to develop Substratus, we’re grounded in the following guiding principles:

1. Prioritize Simplicity

We believe the importance of minimizing complexity in software cannot be understated. In Substratus, we will work hard to keep complexity to a minimum as the project grows. The Substratus API currently consists of 4 resource types: Datasets, Models, Servers, and Notebooks. The project currently depends on two cloud services outside of the cluster: a bucket and a container registry (we are working on making these optional too). The project does not (and will never) depend on a web of complex components like Istio.

2. Prioritize UX

We believe a company’s most precious resource is their engineer’s time. Substratus seeks to maximize the productivity of data scientists and engineers through providing a best-in-class user experience. We strive to build a set of well-designed primitives that allow ML practitioners to enter a flow state as they move between importing data, training, and serving models.

Roadmap

We are fast at work adding new functionality, focused on creating the most productive and enjoyable platform for ML practitioners. Coming soon:

  1. Support for AWS and Azure
  2. VS Code Notebook Integration
  3. Large-scale distributed training
  4. ML ecosystem integrations

Try Substratus today in your GCP project by following the quick start docs. Let us know what features you would like to see on our GitHub repo and don’t forget to add a star!